Image Classification
Note
Requires Huggingface transformers
In this guide, we will use a pre-trained PyTorch model to classify Pokemon images. First, we need to choose where we get our source of Pokemon images from. Here’s a good source: https://www.kaggle.com/datasets/hlrhegemony/pokemon-image-dataset.
Download and extract the dataset into any folder in your filesystem. Just remember the path that it’s in. In this guide, the path that the dataset is in is /data/pokemon.
Load Images By File Paths
Create a new Source Step that loads the images and their labels:
from graphbook.steps import SourceStep
from graphbook import Note
import os
import os.path as osp

class LoadImageDataset(SourceStep):
    RequiresInput = False
    Outputs = ["out"]
    Category = "Custom"
    Parameters = {
        "image_dir": {
            "type": "string",
            "default": "<path to your pokemon image dataset>"
        }
    }

    def __init__(self, image_dir: str):
        super().__init__()
        self.image_dir = image_dir

    def load(self):
        subdirs = os.listdir(self.image_dir)

        def create_note(subdir):
            image_dir = osp.join(self.image_dir, subdir)
            return Note(
                {
                    "name": subdir,
                    "image": [
                        {"value": osp.join(image_dir, img), "type": "image"}
                        for img in os.listdir(image_dir)
                    ],
                }
            )

        return {"out": [create_note(subdir) for subdir in subdirs]}
Make sure to change the default image path to where you extracted the Pokemon image dataset.
The above node will load all the images from the dataset and output them as a list of notes containing the Pokemon’s name and a list of images.
Notice how each image is structured.
It contains a value and a type.
This is important for the UI to know how to fetch and render the image.
Build a BatchStep to Classify Pokemon Images
Now, let’s find an off-the-shelf pre-trained pokemon classifier from Huggingface.
We can use the one with the id imjeffhi/pokemon_classifier.
Let’s create the below BatchStep class that uses this model to classify the images:
from graphbook.steps import BatchStep
from transformers import ViTForImageClassification, ViTImageProcessor
import torch
import torchvision.transforms.functional as F
from PIL import Image
from typing import List

class PokemonClassifier(BatchStep):
    RequiresInput = True
    Parameters = {
        "batch_size": {"type": "number", "default": 8},
        "item_key": {"type": "string", "default": "image"}
    }
    Outputs = ["out"]
    Category = "Custom"

    def __init__(
        self,
        id,
        logger,
        batch_size,
        item_key
    ):
        super().__init__(batch_size, item_key)
        model_name = "imjeffhi/pokemon_classifier"
        self.model = ViTForImageClassification.from_pretrained(model_name)
        self.model = self.model.to('cuda') # If you do not have an Nvidia GPU, you can remove this line
        self.image_processor = ViTImageProcessor.from_pretrained(model_name)
        self.tp = 0
        self.num_samples = 0

    @staticmethod
    def load_fn(item: dict) -> torch.Tensor:
        im = Image.open(item["value"])
        image = F.to_tensor(im)
        if image.shape[0] == 1:
            image = image.repeat(3, 1, 1)
        elif image.shape[0] == 4:
            image = image[:3]
        return image

    @torch.no_grad()
    def on_item_batch(
        self, tensors: List[torch.Tensor], items: List[dict], notes: List[Note]
    ):
        extracted = self.image_processor(
            images=tensors, do_rescale=False, return_tensors="pt"
        )
        extracted = extracted.to("cuda") # Remove this if you do not have an Nvidia GPU
        predicted_id = self.model(**extracted).logits.argmax(-1)
        for t, item, note in zip(predicted_id, items, notes):
            item["prediction"] = self.model.config.id2label[t.item()]
            self.log(f"Predicted {item['value']} as {item['prediction']}")
            if item["prediction"] == note["name"]:
                self.tp += 1
            self.num_samples += 1
        if self.num_samples > 0:
            self.log(f"Accuracy: {self.tp/self.num_samples:.2f}")
The above node will classify the images using the pre-trained model and output the predictions while also calculating its own accuracy given the labels on the images.
It also specifies how the workers should load the images from disk onto Pytorch Tensors with the custom load_fn method which must return a PyTorch Tensor.
Also, notice how the PokemonClassifier has a parameter called item_key.
This tells the BatchStep parent class what key should be batched upon receiving Notes.
Warning
It is recommended to place each Step in its own file because when a .py is saved, it reloads all of the Step classes in that file, clearing any active outputs that could have belonged to a Step. But for the sake of simplicity, we have placed all of the steps in one file for this guide.
Now, go into the web UI and create a new workflow. Add the LoadImageDataset and PokemonClassifer nodes, connect them, and step through the PokemonClassifer like so:
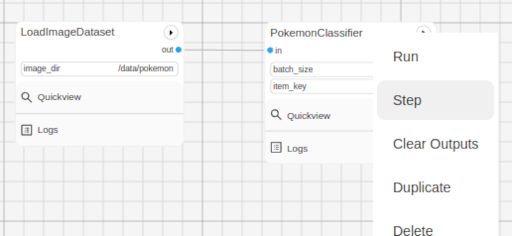
When we clicked on “Step” in the dialogue menu, it didn’t execute through the entire dataset. Instead, it ran a single batch of images taken from the dataset. This is useful for debugging and testing.
Filter Notes by Name
In addition to limiting the number of images processed at a time, we can also filter what is fed into our PokemonClassifer node. We can do that by filtering the pokemon by their name. Add a node called Split (Add Step > Filtering > Split). The node accepts a FunctionResource as a parameter. Add a new Function (Add Resource > Util > Function) and write the following code inside of it:
def my_favorite_pokemon(note: Note) -> bool:
    return note["name"] in ["Pikachu", "Charmander", "Bulbasaur"]
Now, connect the nodes together like so:
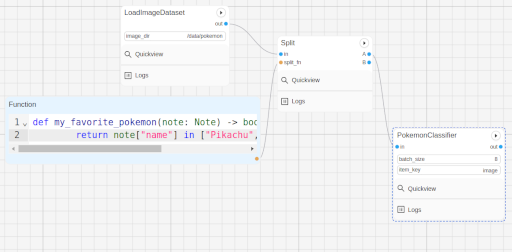
Now, when you run the workflow, you can observe that the classification only happens for Pikachu, Charmander, and Bulbasaur.
Create Model Resources
Last but not least, let’s create two resource nodes that will store the model and image processor and feed it to the PokemonClassifier step. This is important because models are heavy and we don’t want to load them every time that we add a new PokemonClassifer to our workflow. Note that the way we did it is fine for now since we’re just using one of those pokemon classifier models, but normally, it is good practice to separate the model and it’s execution. The top of your PokemonClassifier node should look like this:
class PokemonClassifier(BatchStep):
    RequiresInput = True
    Parameters = {
        "batch_size": {"type": "number", "default": 8},
        "item_key": {"type": "string", "default": "image"},
        "model": {
            "type": "resource",
        },
        "image_processor": {
            "type": "resource",
        },
    }
    Outputs = ["out"]
    Category = "Custom"

    def __init__(
        self,
        id,
        logger,
        batch_size,
        item_key,
        model: ViTForImageClassification,
        image_processor: ViTImageProcessor,
    ):
        super().__init__(batch_size, item_key)
        self.model = model
        self.image_processor = image_processor
        self.tp = 0
        self.num_samples = 0

...
Also, create two Resource classes to store the model and image processor.
class ViTForImageClassificationResource(Resource):
    Category = "Huggingface/Transformers"
    Parameters = {
        "model_name": {
            "type": "string",
            "description": "The name of the model to load."
        }
    }
    def __init__(self, model_name: str):
        self.model = ViTForImageClassification.from_pretrained(model_name)
        self.model = self.model.to('cuda')
        super().__init__(self.model)

    def value(self):
        return self.model

class ViTImageProcessorResource(Resource):
    Category = "Huggingface/Transformers"
    Parameters = {
        "image_processor": {
            "type": "string",
            "description": "The name of the image processor."
        }
    }
    def __init__(self, image_processor: str):
        self.image_processor = ViTImageProcessor.from_pretrained(image_processor)
        super().__init__(self.image_processor)

    def value(self):
        return self.image_processor
Again, the reason we did this is because if we wanted to instantiate multiple PokemonClassifier steps, we can reuse the large models without consuming more of our memory.
Now, your final workflow should look like this:
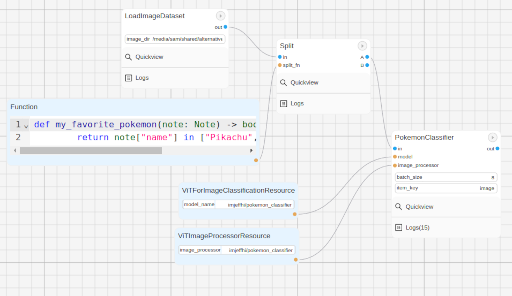
Congratulations! You have successfully created a Pokemon image classifier workflow using a pre-trained model from Huggingface. What if we need to use a model to generate outputs and supply our Notes with those outputs? Follow the next guide to learn how.