Create Your First Workflow
If you haven’t already, make sure to install Graphbook by following the installation guide.
Once Graphbook is installed, execute graphbook in a directory that you want to create your workflows in.
Also, because workflow files are serialized as .json files, it is also recommended to track your workflows and custom nodes in a version control system like Git.
$ mkdir my_graphbook_project
$ cd my_graphbook_project
$ git init
$ graphbook
Executing graphbook should automatically create a directory called workflow containing two subdirectories called custom_nodes and docs like so:
my_graphbook_project
└── workflow
   ├── custom_nodes
   └── docs
All of your custom nodes should be located inside of workflow/custom_nodes. Graphbook is tracking that directory for any files ending with .py and will automatically detect classes that inherit from Step or Resource and functions defined and decorated with @step or @resource.
Write Your First Graphbook Step
Inside of your custom nodes directory, create a new Python file called my_first_nodes.py, and create the below step inside of it:
from graphbook import Note, step, param, output, event
import random

def forward_note(note: Note, prob: float) -> str:
    if random.random() < prob:
        return "A"
    return "B"

@step("Custom/MyFirstStep") # Category/Name
@param("prob", type="resource")
@event("forward_note", forward_note)
@output("A", "B")
def my_first_step(ctx, note: float):
    ctx.log(note['message'])
from graphbook.steps import Step
from graphbook import Note
import random

class MyFirstStep(Step):
    RequiresInput = True
    Parameters = {
        "prob": {
            "type": "resource"
        }
    }
    Outputs = ["A", "B"]
    Category = "Custom"
    def __init__(self, prob):
        super().__init__()
        self.prob = prob

    def on_note(self, note: Note):
        self.log(note['message'])

    def forward_note(self, note: Note) -> str:
        if random.random() < self.prob:
            return "A"
        return "B"
This is a simple step that takes a Note as input and logs an item inside of it called “message”, and then, it forwards the Note to either of its output slots (“A” or “B”) based on the probability provided.
You can provide implementations for any of the methods/events listed in graphbook.steps.Step.
Next, go into the Graphbook UI, and create a new workflow by adding a new .json file.
Warning
Do not try to create the .json file outside of the web UI. Graphbook needs the .json file to be structured specifically to properly serialize the graph and will create the file with such structure if you create it through the UI.
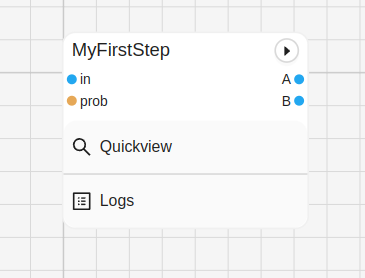
Then, right click the pane, and add a new Step node and select MyFirstStep from the dropdown (Add Step > Custom > MyFirstStep). Notice how your inputs, parameters, and outputs are automatically populated.
Create a Source
If you already tried to run the graph, you will notice that you get an error. That’s because you have no inputs and you haven’t configured prob. Let’s create a Source Step that generates fake data. Create a new file in the same directory called my_first_source.py and add the below code:
Note
The below code doesn’t need to be in its own file, but it is good practice to separate your nodes into different files. See why here.
from graphbook.steps import SourceStep
from graphbook import Note

class MyFirstSource(SourceStep):
    RequiresInput = False
    Parameters = {
        "message": {
            "type": "string",
            "default": "Hello, World!"
        }
    }
    Outputs = ["message"]
    Category = "Custom"
    def __init__(self, message):
        super().__init__()
        self.message = message

    def load(self):
        return {
            "message": [Note({"message": self.message}) for _ in range(10)]
        }

    def forward_note(self, note: Note) -> str:
        return "message"
This source step generates 10 notes with the message “Hello, World!” by default.
You can change the message in the web UI because we made the message a parameter.
Also, if you do not specify any outputs with @output(), Graphbook will automatically give the step 1 output slot named “out”.
Next, add the new node to your workflow by right clicking the pane (Add Step > Custom > MyFirstSource).
Putting Everything Together
Now, let’s connect everything together like so:

Voila! You have successfully created your first workflow, but there’s not much ML in this one. Follow the next guide to learn how to use a real ML model in your workflow.